

Strategies
Krossfire has many difficult levels with no apparent solution. If this is the case for you, have a look at this page and you may find the right easy-to-follow strategy listed for your mission. We welcome submissions of your own strategies or alternate versions of the ones shown here. If you are stuck on a mission which isn't shown, all you have to do is ask.


Survivors
- Death To The Freaks1
- Special Delivery2
- Strike Three3
- Kamikaze Squad4
- Death From Above5
- Hide & Seek6
- This Ain't Avalon7
- The Convoy8
- Let’s Get Technical9
- First To The Middle10
- The Great Escape11
- Impending Annihilation12
- Robots Must Die!13
- The Enemy Of My Enemy14
- Charlie Don’t Surf15
- Phoenix River Suicide Trip16
- Heavy Weapons Operation17
Evolved
- I’ll Be Your Best Friend2
- The Seven Samurai3
- Napalm Sunday4
- The Guns of Navaho5
- Be Vewwy Vewwy Qwiet6
- Aerial Supremacy7
- Supply Run8
- Dam it Janet9
- The Rabbit Warren10
- Wall of Death11
- Repo Team12
- End To The Machines13
- Take The Tower14
- Operation Donut15
- The Birds16
- The Spider’s Lair17
- End To The Symmetrics18
Series 9
- Mutants Off-Line1
- The Lagoon2
- Ground-To-Air3
- Walls Of Jerry Co.4
- Grapes Of Wrath5
- Ring-A-Ring-A-Rosie6
- Bridges Of Mad Son County7
- Divide & Conquer8
- Checkpoint Charlie9
- Gopher Hunt10
- Humans Is Stupid11
- A River Runs Through It12
- Driving Miss Daisy14
- Highway To Hell15
- Islands In The Stream16
- Prototype 3117
- Survivors Go Home18
Survivors
Kamikazee Squad
 This mission is very difficult if you don’t know how to access the tech bunkers, I recommend you to save regularly in order to go back on failed attacks. Form your troops into three groups, using [Ctrl] and a number, one group of men, two for machines and a separate group for those crazy kamikazee, who will blow up your own troops if they can get the chance. This will make it much easier to control your units. Keep the kamikazee behind the other units at all times, search around the immediate area for any threats which could greatly hinder future actions.
March your units up the road and take out the Machine Gunners and War Mastodons. Send your men, not the kamikazee, down the side alley at the corner of the cross road, under the bridge, then south, avoiding the Death Hippo, then up the west side of the map, killing all the Berzerkers you see. You will find a Detention Center in the north-west of the map, destroy this and send all units back along the dried up canal, keep the men together, it is vital that all the Technicians arrive alive, use machines to clear the road to their north. Instruct a technician to open the tech bunkers.
Use the 21st century units and machines to trash the Evolved camp, it is possible for the 21st century units to be out of range of The Worms. Do not use the remaining men in this battle keep them safe, so they can be used to kill the two Crinoids and two Death Hippos to the south. If you are clever you can march one or two Machine Gunners ahead of a Kamikazee and destroy the Death Hippos with minimal fatalities. Continue north along the west side of the map, like before, and take out Evolved units along to the north of the map, a few Pit Scorpions and a couple men.
– Nahoo
First in the Middle
 Press [Ctrl] and select all your troops with the mouse. Move them East and then North up the side of the map, destroy all the Evolved you see along the way. Move West when you reach the top of the map, where you will find a base which needs a little repair. The remainder of the mission is no problem, the oil will be flowing and you can make some cool units to destroy the Evolved base.
– Nahoo
The Great Escape
 Send the captive to the far right hand corner beside a detention centre, through a tunnel, watch out for the Berzerkers as they partol the area. Around the time the Captive arrives at the Safe area, the Mobile Outpost appears from the South of the map. Deploy this in the centre of the valley area and set up base there. Make sure that you have two Power Stations with access to the Oil Puddle. An Anaconda Tank and some men will shortly appear from the north near the safe area, send these at the entrance to the tunnel. Attack some passing Berserkas, then send the men to join the Captive, placing them in a line near the tunnel. Leave the Anaconda tank by the entrance and all future machines, futher men reinforments should join the first group near the Detention Centre. When there are 12 machine gunners protecting the captive, have the others defend your Anaconda tanks.
Upgrade buildings in your base, attacks here are very small at the beginning, but after a time the Evolved send in Floaters and deploy two War Mastodons to the South-East of the small valley and another deployment of Crinoid and Pit Scorpion near the oil puddle in the valley. A really good tip is to have five Anaconda Tanks firing into the landing area of the Foaters. This destroys both the expensive air transport and the goods held inside! Build up your army in the South with Anaconda Tanks, gaurd each exit. You can hinder the enemies efforts by sending and Anaconda Tank just North of the base, and attack Bull Ant Tanks as they furnish the Evolved with resources. Instruct a hoard of Anaconda Tanks to go North-East and take out their Bazooka Batteries, don’t bother with anything else. Do not send re-enforcements towards your base, otherwise they will be shot to pieces. Only when this task has been completed will the Airlifter come and land on the hill to the East of the map. Once the Captive is on the Airlifter tell it to fly back to your base.
– Nahoo
Move your captive to the safe area and once your base has kicked off move him to the top left corner again and down into the cul-de-sac (dead end) where it is extremely safe. You should move every reinforcement to wait at the mouth of this area and build your base as usual. Destroy all the anti-air guns and your transport comes. Pick up the captive and then bring him home.
Let’s Get Technical
 Simply send a Technician across the base of the map to the first Bunker, this like the four others, contain Sentinel Droids, a 21st Century suprt unit. Send this one to the North with your Technicians following behind and use one to open up another Bunker. Open another Bunker to the North West of the magma, then send the latest Sentinel Droid to the South East with the last remaining Technician close behind. Now clear up the South, open up one of the Bunkers there. Send all but one Sentinel Droid to sweep the Series 9 camp to the North, make sure that all areas of the map are showing before the Sentinel Droid has destroyed all Series 9 units hiding behind the wrecked KKND bases.
– Nahoo
Impending Annihilation
Set up your camp and build all buildings, set up another drill rig and power station to the west of your camp around the skeleton. Upgrade all buildings (except power stations for this is unnecessary with this technology limit) set Grenadiers to constant construction and once you have a large army set up attack the Series 9 defence domes to the extreme North. You will need a few groups of these, one to destroy each dome.
Once the domes are out of the way build a few Technicians and send up north, through the trees beside the river, and cross the river where the enemy domes once existed One Technician will do but is better to have a few just in case you are attacked on the way there. Once you have crossed the river send your Technicians down south, pass two oil patches, until you reach a circle will some symbols on it. Send your Technician to this and a Sentry Droid will come out of the circle. He is very strong but can shoot himself if you are not careful, he’ll destroy anything he’s told to, within reason, but is very susceptible to being attacked form all directions. Using the Droid and a few other men, Grenadiers and Hover Buggies, destroy the Series 9.
Before doing this is wise to send an army of fast moving vehicles up to the north, past the sentry domes, and west. You will weave trough a few ridges and dodge to more towers, until you come to an oil rig. Destroy it and this will slow their construction by a great deal. You don’t need to worry about getting this army home for they are not needed, they can put up an good fight though.
Strike Three
The Evolved are surprising under developed at the beginning of the mission, however, they have an excellent base in protected by its elevation. Send off your Dirtbikes around the edges of the map to scout out where you stand in the larger scheme. In the meantime, setup your minimal base to the South-East of the map. There are no attacks on your base, so simply go for the money, taking advantage of your oil inside and outside of the base. You will soon have plenty of money to buy some Artillery and generally tough units to trash that Freak base.
– Nahoo
Robots Must Die!
Move your two mobile buildings in the far corner. Tell them to hide south east of the building to their left. Press [F] for fight mode when the Series 9 robots turn up. Follow the road left, down and left by the river then go down into the gully, where you will find some more men waiting for you. Tell the men to destroy the bridge you passed. Destroy the electric fence of the small Series 9 base Use laser troopers to destroy tower and the tell them all to destroy the other tower. Destroy their base and set up camp. Tell most of your men to go back to the start position and down the road and destroy that bridge. This stops future attacks from the east.
Use your well-developed skill to build a massive base and knock down any more bridges you see to the south. When you have lots of fire power attack the base to the south of you. Continue to follow the roads around the huge map and destroy all you see, there will be a few other bases which can all be accessed without the need of airlifting.
– Nahoo
Now listen up! This level is the hardest Survivor level in the entire game. You start off with some infantry, a Mobile Base and an Oil Tanker. First move all your units the Mobile Buildings first of course. You should see a couple of robots to deal with. Let the Mobile’s take the damage while your infantry destroy the robots (The Mobile’s should not be destroyed if you did it right) then leave your Mobile’s back at the starting point. Then with all your infantry move west and destroy the high tech wall.
Afterwards you should move somewhere South where there a lot of buildings clustered together. Here you should see a lot of Survivor infantry forces. Bring them with you to the starting point and order the infantry to destroy the bridge to the south. This is important later in the game. Then destroy the Radiators and the tower and begin building a base after you destroy the little Series 9 base.
Think it’s over not even close. Now you got two more bases to deal with who will go bananas and try to destroy your new base. Immediately get the resources going, get a Research Lab and upgrade the Armory to the max. You’re gonna need the High Tech Towers to deal with large numbers of forces that come charging at your base. Yeah, and also place some Technicians near the towers in case it comes under heavy fire.
After you have the power to deal with the enemy start building an attacking force (not a vehicle force you moron an air force). You try sending a large vehicle force against the Series 9 in this level and they’re gonna get creamed by well positioned high tech towers and grim reapers. A better way to defeat them is to build an air force which should compose of 4 Orvilles Fighters and 5 Wilburs Bombers and also get a repair constructible to repair your air units. Head to the large base on the west and immediately destroy the AA towers and any other unit that can fire back at ya. You might have to bring some units back for repair because of heavy fire or perhaps build some more air units. Once you’re done wit the AA towers, The Mobile AA unit and the Rocket soldiers you should immediately toast their resources. Then destroy their Barn (very important considering that without it they can’t build any AA towers which could ruin your mission pretty darn quick.) Then every thing else. Now you have a much smaller less defended base north west to deal with.
You shouldn’t have any problems wit this one. Now Finally for the easy part (guess you being waitin’ for dis one Huh?) simply destroy the remaining units on the map. Oh yeah! and make sure you save your game often during this mission in case anything went wrong.
– Karthik “The Killer” Shivaji
Phoenix River Suicide Trip
 If you act quickly you will only receive two attacks from the Series 9 in the entire mission. Firstly, extend you base North and capitalise on the oil reserves to the north and through the dinosaur skeleton. Build an Armoury and upgrade this to give you Cannon Towers. Upgrade the Machine Shop and Barracks two levels and churn out 2 Drill Rigs, 3 more Oil Tankers, to boost your money making capabilities, loads of Flamers plus a few Technicians. Now build two Cannot Towers to the North and East of your base to protect Drill Rig and new Power Station. This will fend off almost any Series 9 offensive.
You now have lots of money and lots of units, time for the fun part. Send a few Hover Buggies and your Flamers up the river or river bank. Send the Hover Buggies in first and the Flamers soon afterwards. Your Flamers will mince the Pod Cannons in no time and will allow a couple Technicians to slip past and unlock a bunker on the opposite side of the river. The rest is a walk in the park, send the Sentinoid to sort out the dirty work and use the Flamers to mash up the buildings in record time. Watch out for the Distance Seeders firing above the cliff, this will suck the novice 21st century unit’s life juice, move it quickly to the north out of range. The Series 9 are dead, in a big way.
– Nahoo
The mission briefing gives you a clue, send units which can travel on water up the river, tell them to wait just out of range from the three Pod Cannons. Send some men and a few Technicians with them, through the woods by the river, and stop them before they reach the Pod Cannons. When you have enough water units to distract the Pod Cannons for a few seconds, send the Technicians across the river and down the other side. You will find a tech bunker with enough long range fire power to annihilate Series 9.
Build less than 10 Hovers up the river, 9 Anaconda tanks and 2 Cannon Towers to defend your base, and hundreds of Grenadiers and Flamers to destroy enemy base.
Note: Never attack from the front entrance of the enemy base.
– Evan Xu
The moment you start build a Research Lab and one more Barracks, then send the few soldiers you have to the entrance to your base and get them to Fight Mode [F]. Don’t build an armoury, it wastes both time and money. Upgrade Barracks immediately and build about 40 Grenadiers to chomp their base. The Series 9 will first send two waves of troops to attack, then they will stop and upgrade every single building to max. Now they will send wave after wave of idiotic troops to krush your base. The trick is to send your 40 Grenadiers up to their base, via the top entrance, otherwise you’ll die, before they upgrade everything. Ignore the three Pod Cannons on top of the cliff at the top entrance, the Grenadiers can sneak past those Cannons. Destroy the two Distance Seeders guarding the top entrance and destroy their Oil Bots. Now they are defenceless, send some more Grenadiers or/and Flamers to demolish their base. Well done, that’s it!
Evolved
The Guns of Navaho
Simply build a beast enclosure and produce a derrick after which you deploy it at the oil puddle and build a power plant. All this must be done after a fairly massive 2nd attack from the series 9 then quickly built your stuff and annihilate the enemy!
– Han Kyaw
Dam it Janet
Ok, you start out with all your buildings beat up for no apparent reason and your rigs about to be under attack. Don’t be intimidated, this level is easy. First build a couple Pit Scorpions to kill the attack party and when they’re done with that they can blow up the Macrounit Factory just above the entrance to your base (don’t get too close to it, otherwise the Pod Cannons will get you).
Deploy your Mobile Clan Hall right where it is and recycle it, there is no reason to have two bases. Fix your buildings, recycle your Healing Tent and start upgrading! Do the Alchemy Hall first, then Power Station then Beast Enclosure, build another Tanker (and Scorpions to defend if necessary). Upgrade warrior hall once, train eight Rioters; send them out the top entrance and down to where the Microunit Factory can be found, above the macrounit factory in case you can’t see it. When you have found the Microunit Factory, use Rioters to blow it up. They will keep trying to rebuild so leave rioters there to keep blowing it up. Send next batch of rioters down from oil rig and kill the Distance Seeder down the cliff and flatten any resistance.
After that’s done wipe the pointless base out. Your ready to hit ’em where it hurts! Get a bunch of Rioters (about 15) and take them down to the ex-lower Series 9 base amd send them left from there. Keep them on top on cliff, don’t send them left at base of cliff. Traverse across dam, and blow the crap out of their Oil Rigs. The Series 9 will then be broken and you should have no trouble destroying them all.
– Jay
Operation Donut
This level is awful. But this is what you gotta do: immediately take all units to the far right following the upper path. Keep two Spirit Archers in front to kill enemies on your way. When in corner, head strait down till your in the lower right corner. Use oil puddles to left and build camp. Immediately upgrade Clan Hall to build Low Tech walls, then build them. Establish big base while keeping the Series 9 back with the walls. Note: Do not blow up the bridge to left! It will make it nearly impossible to lead an effective strike against enemy. Ignore almost empty oil puddles, send death hippos left, up and across water when mass attack is ready. send non amphibious units to attack across bridge. Then you win!
– Jay
Wall of Death
This mission is too hard. Out of 51 missions it was the blip. Sorry about that. The original was way too easy, so it got upgraded. Unfortunately this got a bit recursive. Each pass seemingly getting easier because we knew precisely how to do it. Well here is how. This is a precision mission.
Make game crawl along at minimum speed and remember to save after EVERY step. Number all fighter group 1, tech & bomb 2. Keep them moving.
Head northwest till just past the shallow river. Once there head south and regroup on the eastern high ground.
Blow up one of the patrolling tanks and then run for it heading south past the allied camp. They are there just for show. Ignore them. Head east and then south to the small APC’s waiting for you. There will be some minor bad guys hanging around but they should not be a problem. You should not have lost a man by now, and a couple of your foot troops are veterans.
Drive west against minor resistance. Keep as far south as possible. Do not attack the ATV’s. Stop at the cactus.Walk forward in tight formation and kill the enemy foot troops stationed on the other side of the cactus. Hopefully you are still to lose a man. Avoid the Turret Station all foot troops on the high ground an inch due south.
Run one APC along the road to the west until you trigger the ATV’s and run. Sucker the ATV’s north of your troops and mow them down. Alternately you can blow them up with the Kamikaze. Follow the now clear road west then north. Go through the cactus to avoid the rocketeers. Approach the back of the Survy base.
Now the hard Bit. The Wall of Death. The wall turns off to allow tankers and troops through. Wait for a tanker to approach the wall and gun it. The tech should be in the second APC and all the other troops are there just to take the pain.
The Research Lab is just north of the wall. Unload the tech and WIN WIN Win… hang on….
Reinforcements have just arrived to the extreme east. Depending on how long Part 1 took this could be easy, it could be hard. Build like you have never built before. Go for income. If it does not make you money, ignore it. You do not need to build defences for a while. Move all combat units to the west and form a straight line out of them. Nothing should attack you for a little while.
Once you have been attacked, build a Healing tent and repair your units. Try very hard to keep them alive. Make more money Kill bad guys. Did it again today in 1:25 game time, 2:00 real time. You can take it from here!
Series 9
Walls of Jerry Co.
 Place your Pod Launchers and Cauteriser over looking the cliff above the Oilbot. Build a Macrounit Factory and setup producing a Mobile Oilbot to move the the Oil Puddle within your base, contruct another Power Unit so that both Oil Tankeroids have only a short distance to travel. Attacks into your base can be easily fought off with the cliff advantage. Air power is utilised by the Evolved, some counteractions would be adviseable as well as some cannon fodder in the early stages.
Build plenty of air units to knock out those Evolved troops dotted around the map and a few Grim Reapers to sort out the AA units. You won’t find any challenging resistance once you have the money flowing.
– Nahoo
Divide & Conquer
 You start the mission at the bottom left of the map. In order to successfully cross the river you must keep all units together, keeping Mobile Barn safely behind armed units. There will be a small resistance as you get closer to the bridge towards the east side of the map. Be careful not to go too close to the Survivors camp to the far east. Take out the Sentry Gun before crossing the river, this will stop your units being weakened as the cross the bridge.
Set up camp north of the bridge, in the space between the oil. Send a few units to destroy the bridge you came across. This will prevent any future attacks from the south-east camp. Send a Systech to open the Bunker and you will find the ultimate spying solution and transportation to get you across the river later in the mission.
The Survivor camp to the west will only send small attack parties, these can be easily fended off, due to the amount of oil puddles in you camp. Send Weed Killers to the heart of enemy camps by air. They will quickly do serious damage to enemy buildings and make their feeble attacks even more weak. When you see their empire crumbling direct 20 Tankbots to do their stuff.
By now, you should have a considerable number of troops. Airlift them to the other side of the collapsed bridge and then all together, march them towards the camp, leaving no traces of Survivor existence.
– Nahoo
Grapes of Wrath
You can do what the robot in the briefing tells you to, or you can do what I did. Build technostudy and upgrade to full. Then upgrade barn to build low tech walls. Use one Sterilizer to kill the guys up near your oil. Keep the rest to guard the lower entrance. Build walls when necessary. Upgrade machine shop full. Build a Transport Dome. Build two Systechs, put them in the transport dome and send them strait up until you reach corner. You will be shot at, but frankly it won’t matter. Use Systechs to open both tech bunkers. Start building Grim Reapers. Use Gort to wipe out the entire green base, than send him down to keep killing everything he encounters. Than take army of grim reapers to right of your base, and destroy red base with them. Once everything opposing you is gone, you have completed your mission.
– Jay
A River Runs Through It
You have 6 infantrymen in South East corner. Destroy Barrage Craft from a cliff, move infantrymen to trees and wait on reinforcements in North West corner. You get 2 Doom Domes. Move them on the right to the river, destroy a bridge from the river and move them further, in turns on the river and on the mainland. Destroy the Sentry Gun on South and 3 Sentry Guns nearby a west bridge. In this way, you release the way for your infantrymen. Now you can attack on the west part of survivor’s camp. You must destroy Force Walls and overpower Cannon Tower. Then Doom Domes can destroy central buildings of enemy camp. At the same time, move infantrymen along cliffs on the left to the Drill Ring and destroy it together with Oil Tankers. Meanwhile you are getting next reinforcements. In the end, destroy 2 Cannon Towers on North and on South.
Note:
This mission challenges an exact dislocation and co-ordination. The par time is 40 minutes and my record is 32 minutes.
Islands in The Stream
Your base is on the island in the north part of map. Dislocate your infantry and vehicles on cliffs and defend entrances. Main attacks come from North and West. Build up the complete base and strong power resources. Be prepared on air attacks. Destroy the Drill Rig and Power Station on North West of map by Doom Dome. Produce a Transport Dome and Grim Reaper. By them, you can destroy survivors on islands in the centre of west margin. The best vehicles against a Laser Destroyer are Fighters. Then you can occupy the island on the centre of map. Doom Dome and fighters can destroy Force Walls and Cannon Tower in entrance of this island. Then your Huge Artillery eliminates the Laser Destroyer. Dislocate 3 Huge Artilleries on south margin of captured island and destroy over channel all in their range. Meanwhile eliminate the Laser Destroyer in west part of survivor’s base. The good method is to combine attacks by fighters and the Huge Artillery from nearby island. Send landing forces to this place, destroy all and move to the center of survivor’s camp. Strengthen your attack and in the end destroy whole camp.
Note:
This mission demands strong resources. Use mobile repair vehicles. The par time is 1:15 and my record is 1:06.
Prototype 31
You have a camp in the centre of map. The north entrance goes to Survivors and the south one goes to the Evolved. Occupy these entrances and defence your camp. Make up two units from 2 Doom Domes. Send the first unit on North East. This unit destroys Sentry Gun and Barricades. Then you can stepwise destroy resources of survivors. At the same time, send the second unit on South. Here, you attack on the Kneecapper from water. It provokes Evolved, which you destroy on south entrance of your camp. After this, you can continue in the attack. Your second unit destroys Bugzappers, goes to the Evolved’s camp and destroys all here. Meanwhile produce a Transport Dome. You can move the Mechanoid and Gort according to your needs by this plane. These robots are very good against Cannon Towers and Worms. The best vehicles against possible Touch of Deaths are fighters. When you destroy all firing devices of your enemies, you can destroy all others.
Note:
This mission is not very heavy – the par time is 50 minutes and my record is 22 minutes.
Survivors Go Home
The map of this mission is very large. Your camp is dislocated in South West corner. The survivors have 4 camps, very strong power resources and a defence from Laser Destroyers and AA Towers on the right and top part of map. In the first phase, you must defence your camp and simultaneously build up strong power resources. Firstly build up Oilbot, recycle Power Unit and rear it closest to Oilbot. At the same time, strike back the attack from East. Extend the defence and power resources of your camp. A good hint is a Bugzapper in entrance. Survivors fire only this Bugzapper and you can destroy them without any losses. When you build up completely your camp, then you can launch the second phase. Produce a Transport Dome and Grim Reaper. Send them on cliffs in the south centre of map, nearby AA Towers. Destroy them and send more Grim Reapers here. In this way, you dominate the first camp of survivors. Send a empty Transport Dome on East. You obtain the Gort here. Transfer this robot on the North East by the plane. The Gort can destroy Oil Tankers here. Send more Grim Reapers for this destruction. When you destroy all resources of survivors in North and East, you can begin the last phase. Your task is to destroy the rest of survivors. The best vehicles against Laser Destroyers are fighters.
Note:
This mission is really extreme – my first successful attempt took 23 hours. Very important thing is full sail to destroy power resources of survivors. The par time is 2:45:00 and my record is 56 minutes
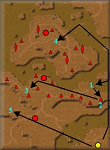
Ground-To-Air
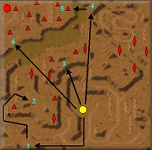 You have an uncompleted camp (yellow circle on the map) in a valley. Build up the complete camp and ensure its defence – two Distance Seeders in the entrance are sufficient. Send a Grim Reaper to the point 1 by air. This Reaper can destroy two Bazooka Batteries (triangles on the map) in the plateau 2. Then send this Reaper to the point 3 (near the cactus) by air again and destroy two next AA batteries. In the next step, send the Doom Dome to the point 4 by air. This Dome can destroy four AA batteries by fire from the plateau 5. Then send the Reaper to the point 6 (closest to the river) and destroy remaining AA batteries. Now, it is time for your fighters – they can destroy all Touches of Death (rhombuses on the map). Be careful on Homing Bazookoids – when they fire on your fighters, attract them into the range of your weapons. Meanwhile, destroy enemy camp and all other means.
Notes:
- This strategy requires very careful landing manoeuvring.
- The part time is 0:50 and my record is 0:45.
The Lagoon
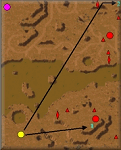 You have an uncompleted camp (yellow circle on the map) in a plateau. Build up the complete camp and ensure its defence – two Distance Seeders in the each entrance are sufficient. Send a Grim Reaper to the point 1 by air. This Reaper can destroy all infantry and animals in the enemy camp. Then destroy Bull Ant Tanks and all Bazooka Batteries (triangles on the map). Now, your fighters can destroy the Touch of Death (rhombus on the map). Meanwhile, destroy other enemy means in this camp. At the same time, send next Grim Reaper to the point 2 by air. This Reaper can destroy all Bull Ant Tanks and all Bazooka Batteries in the north camp. Then send fighters there. They can destroy all enemy towers. Strengthen your attack and destroy all another enemy means.
Notes
- Attack quickly – the enemy must not build new Touches of Death.
- The par time is 1:50 and my record is 0:57.
Mutants Offline
 You have vehicles and infantry in the south-east corner (see map). Send the combat vehicles and infantry to the beach. They defend the entrance in your territory. Then build up your camp. After this, send a Grim Reaper to the point 1 by air (closest to the east margin). This Reaper can destroy the most east Bazooka Battery (triangle on the map) – you obtain free air corridor to the North. Send this Reaper to the point 3 and destroy all combat units, towers and Bull Ant Tanks there. After this, continue in destroying of whole camp. Meanwhile, send a Cauteriser to the point 4 by air. Destroy all infantrymen and Bull Ant Tanks there. Strengthen this attack by a Grim Reaper. Destroy all Bazooka Batteries and all enemy means without range of the Touches of Death (rhombuses on the map). Then your fighters can destroy all enemy towers and all other means of this island camp. In the next step, send a Grim Reaper to the point 5 by air. Destroy enemy power resources and all towers there. Strengthen this attack and destroy the remainder of the last camp.
Notes:
- Attack quickly – the enemy must not build new Touches of Death.
- This mission is the same as the mission of Survivors “Death to the freaks”.
- The part time is 2:20 and my record is 1:17.
- The resume of this mission is incorrectly entitled “Ground-to-air” instead of “Mutants off-line”.